Welcome to the aprs.fi app! I thank you for your purchase, it’ll help me to keep the service running. This guide will get you started.
The aprs.fi app is a quick and mobile device friendly version of the familiar web service. It downloads current APRS information directly from the aprs.fi service and displays it instantly. It can also be attached to a radio for the proper Amateur Radio experience. The app works great on all current Android phones and tablets.
Before we start
Mobile data usage
The app requires a working Internet connection either through Wi-Fi or cellular data. Your cell provider may charge you for transferred data. All data is compressed by aprs.fi before it is downloaded by the app. The amount of data transferred by the aprs.fi app may be monitored from Android Settings → Network & internet → Data usage.
In-app payments
Some of the new features of this app are available through an in-app subscription. All basic features that are currently available in the app, and some functions which are added later on, will naturally stay available without additional payment.
In-app subscriptions provide a sustainable business model. They ensure continuous interest in developing and maintaining the application and its backend service even after the finite number of interested APRS users have already purchased the app.
Features currently included in the Extra Features subscription are:
-
Text messaging
-
Beaconing to APRS-IS
-
"Soundcard" DSP modem / TNC
-
Long time ranges on map and graph views
-
Up to 10 station profiles in Beacon
Signing up for the aprs.fi account
Many features require a free aprs.fi user account. You can sign up for the account from the More tab → My account, if you don’t have one yet. The account is used for synchronizing your settings, and for messaging and beaconing your position.
If the confirmation email does not arrive, please check your spam/junk folder. If you still do not receive the email, do contact me: Feedback and support
|
Note
|
This app does not use an APRS-IS pass code, as it does not directly connect to the APRS-IS. |
Basic usage
Tracking stations on the map
To track a specific station, search for it on the Search tab, and select a station to enter the station details view. Tap the Track button to start tracking. To track multiple stations at a time, search for additional stations and tap Track again.
To stop tracking a station, drag the station’s callsign button and drop somewhere on the left, as shown in the following video. Alternatively, tap Stop tracking in the station details view.
When tracking multiple stations, the Fit button will fit all tracked stations into the map view.
Navigating on the map
To center on your current location, tap the Centering button in the lower right corner of the map; the map zooms in if it is not already zoomed in closer. Once centered, tap again to switch the map orientation between north-up and heading-up.
To center on a currently tracked station, tap the respective callsign button in the lower right corner. Tap again to zoom in. While tracking multiple stations, an additional button is shown for quickly fitting all tracked stations in the view.
If you zoom out far enough, the amount of data presented may be a little bit too much for the device, and updates will be paused. Zoom in to refresh again.
Map time range
To change the time range of the map, tap the Time range button in the bottom of the map view. The time range selects how far back in time the stations are shown on the map.
The default time range is 1 hour, but you can select from a number of predefined ranges.
Filters
To filter the stations shown on the map, tap the Filter (funnel) button in the bottom of the map view. A few default filters are set up as an example.
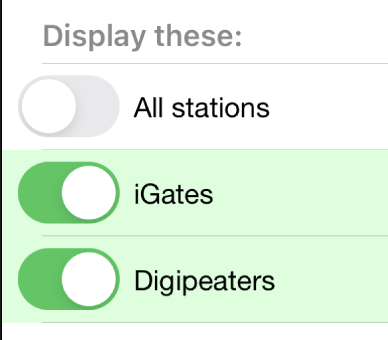
Each of the filters in the chain can be enabled and disabled independently with the toggle switch on the left. A disabled filter has no effect. The following filter shows only iGate and Digipeater stations:
Filters are not applied when tracking specific stations.
The filter chain has two sections: Display these and But not these. If one of the enabled filters in the Display these section matches a station, it will be shown on the map. If nothing matches the filters, no stations will be shown – enable the "All stations" filter to show all stations again.
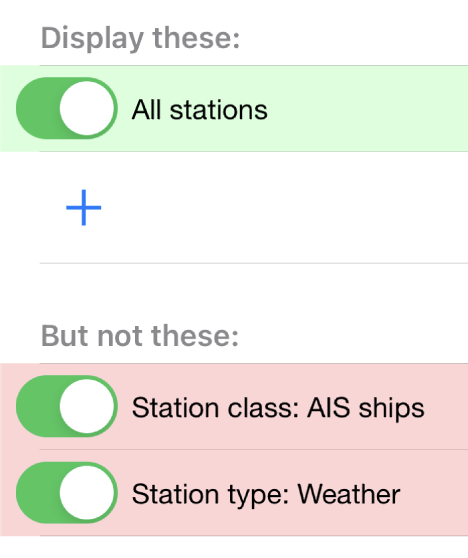
The But not these section contains filters that will hide stations which would otherwise be shown by the previous filters. It can be used to create exceptions, such as "Show all stations except weather stations". Press the red and blue up/down buttons on the right to move filters between the two sections.
The following filter will show all stations, except maritime traffic reported with AIS and weather stations:
Press the + button to add a custom filter. You can set up filters for any combination of the following criteria:
-
Data source (network / TNC), when a TNC is set up
-
Station class / data source (APRS, AIS, web)
-
Speed
-
Altitude
-
Symbol
-
APRS Station type: Location, Item, Object, Weather
-
Digipeater / iGate detection
-
Station/object name/callsign (with wildcards)
-
Source callsign (with wildcards)
-
Destination callsign (with wildcareds)
-
Packet path (with wildcards)
-
APRS device vendor and model (with wildcards)
A single filter can compare for multiple criteria. For example, you may wish to show all stations with a specific symbol, but only those which are moving faster than 10 km/h. Press the + button to add comparison, and press OK when the filter is ready.
Map symbol and text size
To change the station symbol size and the text size on the map, repeatedly press the scale button on the bottom of the map. This cycles through the three available sizes.
Map style
To change between navigation and satellite map styles, tap the Map style button in the bottom of the map view.
The Navigation style is a standard map with streets and place names, while the Satellite style shows satellite imagery. The third option is Hybrid, which combines the two styles, showing streets and place names on top of the satellite imagery.
The app remembers your last view
The application stores the last view and map settings, so the next time you open the app, it will show the same view as you left it. It remembers filter settings, the tracked stations, and the map position and zoom level. It will even remember them if you power off the device and turn it back on later.
If nothing is shown on the map
-
If you are tracking a specific station, its callsign is shown in the lower right corner. Tap it to center on the station, or drag it to the left side to stop tracking and show all stations again.
-
IF you’ve zoomed out to show a very large area, the database query to load the data may be too heavy, and the app will pause updates. A message will be shown when this happen. Zoom a bit closer to refresh again.
-
Check filters. Tap the Filter (funnel) button in the bottom of the map view, and check if any filters are enabled. Make sure the "All stations" and "From network" filters are enabled.
Station details view
Pull the information table down to refresh the information. It will be refreshed periodically, too.
Graphs of speed, altitude, weather and telemetry can be drawn for many stations.
Favourite stations
You can add stations to your favourites by tapping the Star button in the station details view. Favourites are shown in the Favourites tab in Search, and can be tracked from there.
Favourite stations are synchronised with the aprs.fi service, so they are available on all your devices. You can also access your favourites on the web site using the Star button on the right side of the map view.
Beaconing your position
To publish your position on aprs.fi, please log in using your aprs.fi user account. If you do not have an account yet, you may sign up for the free user account. Note that the password is not the same as your APRS-IS passcode.
Please note that the positions will by default only be uploaded to aprs.fi. They will not appear on the APRS-IS or other APRS applications. Beaconing to APRS-IS can be enabled with a switch while the Extra Features subscription is active.
Transmitting positions on the APRS-IS requires an amateur radio license and valid callsign.
Beacon profiles
You may set up multiple APRS station profiles in the app, each with different symbol and other settings, allowing quick switching between the stations.
To set up a new profile in the Beacon tab, tap the current station callsign to view the list of profiles. Tap the New station button, and enter the callsign, SSID (Secondary System Identifier), and other settings for the new profile.
The SSID is a number between 1 and 15, appended to the callsign with a hyphen, e.g. N0CALL-1. The SSID is optional, but it is needed to distinguish between different stations and devices of a single user. The SSID if 0 is, by convention, reserved for the main station, and not shown.
Non-numeric SSIDs of one or two characters are allowed, but they cannot be used when beaconing to APRS-IS, or when using a TNC.
To rename a profile, tap the Rename button at the bottom of the Beacon tab, and enter a new name. To delete a profile, tap the Delete station and all data button at the bottom of the Beacon tab, and confirm the deletion.
Packet path selection
When transmitting beacons to RF using a TNC and a radio, a suitable packet path should be selected. The packet path selects the amount and type of digipeaters which are requested to retransmit the packet.
The default of WIDE1-1,WIDE2-1, which requests two digipeater hops, is suitable for most cases, but you may wish to change it to meet local network requirements.
A TRACE2-2 path requests two digipeater hops, where the digipeaters should insert their own callsigns into the packet. This is useful for tracing the route of the packet through the network.
The ARISS path is used when transmitting via the ISS (International Space Station) digipeater and other APRS satellites.
An empty path will not request any digipeaters, and the packet will only be transmitted by your own station. This is useful for testing, or when you wish to transmit a position without any digipeater retransmissions.
The aprs.fi blog has a detailed article on APRS paths and digipeaters.
Custom paths
Custom paths may be set up using the + button in the bottom of the packet path selection view. You can enter a custom path with any valid APRS digipeater aliases or callsigns of specific digipeaters.
Custom paths will be stored and can be easily selected later on in the same view.
Beacon timing
The aprs.fi app implements a smart beacon timing algorithm which adjusts the transmit interval based on your speed and movement. It will transmit more often when you are moving faster, and less often when you are not moving. It will also detect tight turns and send a new position as soon as possible. This helps to save battery power and reduces the amount of data sent over the network.
Increasing minimum transmit interval will reduce the frequency of transmitted beacons. If you wish to transmit a less exact position for for privacy reasons, you can increase the minimum interval and enable position ambiguity to further reduce position accuracy.
Decreasing maximum transmit interval will increase the frequency of transmitted beacons while you are not moving.
If the minimum and maximum interval are set to the same value, the smart beacon algorithm will not be used.
Beaconing via APRS-IS
APRS-IS beaconing is available with the Extra Features subscription. To enable APRS-IS beaconing, go to the Beacon tab, enable Beacon via APRS-IS.
Note that the APRS-IS is a public network, and your position will be visible to anyone. There is no privacy. Data sent to the APRS-IS is archived by a number of services, and will be available for download or viewing even after you stop transmitting.
Beaconing via TNC
To transmit your position via a radio, you need to set up a TNC connection. Please see Connecting to a radio.
After a TNC is set up, enable Beacon via TNC in the Beacon tab.
Data transmitted on amateur radio frequencies is not private, and will typically be received by iGate stations which forward the data to the APRS-IS.
Beaconing in the background
Deleting uploaded position history
If you wish to delete the position history uploaded to aprs.fi, go to the Beacon tab, scroll down to the bottom, and tap the Delete station and all data button. This will delete all positions uploaded by the app from the aprs.fi service.
If you have transmitted data via the APRS-IS or using a TNC, it will be likely archived by other services, and may still be available for download or viewing.
Messaging
The aprs.fi app supports sending and receiving APRS text messages. The feature is included in the Extra Features subscription.
For messaging to work, a valid callsign-SSID must first be set up in the Beacon tab, as it will also be used for messaging. The callsign-SSID pair must be valid for use in the AX.25 packet radio protocol. The callsign must be a valid amateur radio callsign, not longer than 6 characters. The SSID number (1-15) is optional, but it is needed to distinguish between different devices of the same user. Examples: N0CALL, N0CALL-5, OH7RDA-15.
To start a conversation, tap the Messages tab, and then tap the New message (letter) button in the top right corner. Enter the destination callsign, with the correct SSID (Secondary System Identifier) if necessary, and press the Send button to open up a new message thread.
Alternatively, start a new message thread directly from a station details view.
To send a message, simply enter the text in the message input field and tap the Send button. Transmitted and received messages are shown in the message thread, just like in any other messaging app.
The message can be sent either via APRS-IS (Network) or via a TNC connection. The transmission method is selected using the Transmit using button in the bottom of the message thread. If you have a TNC set up, you can select it to transmit the message via the radio. Otherwise, select Network and the message will be sent via the APRS-IS network. If Automatic is selected, the app will automatically select the best transmission method available and try both if necessary.
Messaging privacy
There is no privacy in APRS messaging. Messages sent via the APRS-IS network are public, and anyone can read and archive them. Messages sent via a TNC are transmitted on the radio frequencies, and can be received by anyone with a radio receiver.
Push notifications for new messages
The aprs.fi backend service will send push notifications for new messages to the app. To receive push notifications, you need to have them enabled in the device Settings app. When first using messaging, the app will ask you to allow notifications. If you accidentally denied notifications, you can enable them again in Android Settings → Apps → aprs.fi → Notifications.
Message retransmissions and acknowledgement
The app will transmit each message up to 6 times, with an increasing delay between each transmission. This is to ensure that the message is delivered even if the first transmission fails due to poor radio conditions or other issues.
When the recipient’s APRS software receives the message, it will send an acknowledgement (ACK) back to the sender. The message will be marked as delivered, and further retransmissions will be stopped.
If you wish to resend a message, keep your finger for a moment on the message in the message thread, and select Retransmit from the menu. This will initiate a new sequence of retransmissions.
It is also possible to abort the retransmissions of a message by keeping your finger on the message in the message thread, and selecting Abort.
APRS messaging reliability
The APRS messaging system is not always very reliable. For a message to be delivered to a recipient on the RF network, the recipient must be within range of a transmit-capable (TX) iGate gateway station, or a digipeater near such a gateway. The network currently does not have means to indicate whether such coverage is available.
Unfortunately many APRS iGates are receive-only (RX) and do not transmit packets, due to licensing issues or hardware limitations. Receivers are cheap, transceivers are more expensive, and in many countries an automatic transmitting station requires a special license. In such cases messaging may only work to one direction - from RF to APRS-IS, but not back to RF.
When you’re transmitting packets from RF to the APRS-IS via a receive-only iGate, the acknowledgement packet will not be transmitted back to RF. The app will not know that the message was received, and will keep retransmitting it until the maximum number of retransmissions is reached.
Searching for conversations
In the message threads view, you can search for conversations by entering a search term in the search field at the top of the view. The search will match against the recipient callsign and the full text of the latest message.
Deleting messages
Individual messages can be deleted by keeping your finger on the message in the message thread, and selecting Delete from the menu.
A message thread can be deleted by swiping left on the thread in the message list, and tapping the Delete button. Alternatively, swipe the thread all the way to the left and it will be deleted with a single movement. Be careful, there is no confirmation dialog or undo for this action!
This will delete all messages in the thread and the thread itself. The messages will only be deleted from the app on this device.
Mass deletion of messages
To delete many threads at once, tap the Edit button in the top right corner of the message threads view. This will enable the edit mode, where you can select multiple threads to delete. Tap the Delete button in the bottom right corner to delete all selected threads.
To delete all threads containing a specific word or phrase, enter the search term in the search field at the top of the message threads view, then tap the Select all button in the bottom left corner, and the Delete button in the bottom right. This will delete all threads matching the search term. This is useful for deleting all APRS Thursday messages, which contain the word HOTG.
Connecting to a radio
The aprs.fi app supports multiple methods for connecting to a radio or TNC (Terminal Node Controller) to transmit and receive APRS packets. The connection method depends on the hardware you have available.
Using a BLE TNC or radio
BLE (Bluetooth Low Energy) is a wireless technology for connecting devices with low power consumption. It is a part of Bluetooth 4.0 and later.
The aprs.fi app automatically detects and supports all TNCs which support the BLE KISS specification. There is no need to add support for new radios or TNCs to the app, as long as they follow the BLE KISS specification. They just work, and they also work with a number of other apps following the common protocol.
BLE devices are automatically discovered and listed in the Select a TNC view. If you have multiple BLE TNCs, you can select the one to use for the connection. Just turn the BLE device on, enable BLE in the device if necessary, and pick it from the list. It feels like magic!
Most current BLE TNCs only support a single connection at a time. If you are also using a separate configuration app for the device, you may need to disconnect the TNC from that app before you can connect to it with the aprs.fi app. Likewise, you may need to disconnect the TNC from within the aprs.fi app before you can use it with another app.
Here are some of the supported BLE devices:
-
Mobilinkd TNC3 and TNC4
-
PicoAPRS v4 transceiver
-
RPC Electronics ESP32-APRS Tracker
-
Island Magic Co. B.B. Link Adapter for Kenwood TH-D74/D75 radios
-
VGC VR N76, Radioddity GA-5WB, BTECH UV-PRO radios contain a built-in BLE TNC. They are essentially the same device, with different branding.
Notably, none of the current Kenwood APRS radios support BLE KISS. The B.B. Link Adapter can act as a bridge between the classic Bluetooth TH-D74/D75 radios and BLE, allowing the app to connect to the radio.
Using a Classic Bluetooth (SPP) TNC
Classic Bluetooth Serial Port Profile (SPP) allows connecting to KISS TNCs which communicate over a classic Bluetooth serial connection. The Kenwood TH-D74 and TH-D75 radios support this mode.
|
Note
|
Classic Bluetooth is only supported on Android. iPhone and iPad apps cannot communicate with classic Bluetooth devices; a BLE adapter such as the Island Magic Co. B.B. Link Adapter is required for use with iOS. |
Pairing the radio with Android
Before the radio appears in the aprs.fi app, it must be paired with the phone:
-
On the Kenwood radio, open the Bluetooth menu and enable Bluetooth, then select Pairing to put the radio into pairing mode.
-
On the Android phone, open Settings → Connected devices → Pair new device. The radio will appear in the list — tap it to pair. Accept the pairing on the radio if prompted.
After pairing, the radio will appear in the Paired Bluetooth TNCs section of the Select a TNC view in the aprs.fi app. The app needs access to Bluetooth — if it asks for permission, tap Grant.
Setting the Kenwood TH-D74 / TH-D75 to KISS mode
The radio must be in KISS 12 mode, not APRS 12 mode:
-
In APRS 12 mode, the radio handles APRS itself and does not forward packets to the Bluetooth TNC client — no packets will appear in the app.
-
In KISS 12 mode, the radio acts as a plain KISS TNC and forwards all received packets to the connected phone. The app decodes the packets.
To enable KISS mode, press F + 5 (APRS) until the display says "KISS 12" (12 refers to the 1200 bit/s AFSK modem speed used by APRS).
|
Caution
|
While the radio is in KISS mode, its built-in APRS functions — such as the station list, messages, and the built-in map — are suspended. The radio acts as a plain radio modem. Return to APRS 12 mode to re-enable the radio’s own APRS features. |
Using a USB serial TNC
Android supports USB serial TNCs connected via the USB port of the phone or tablet. Both native USB KISS TNCs (such as the Kenwood TH-D74 and TH-D75) and separate USB-to-serial adapters connected to a hardware TNC are supported.
Connecting the device
Plug the TNC or radio into the Android device using a USB cable. When prompted, grant the aprs.fi app permission to access the USB device. The device will then appear in the USB serial TNCs section of the Select a TNC view.
Tap the device to connect. A dialog will ask for the serial port speed:
-
Kenwood TH-D74 / TH-D75 and similar radios with a built-in USB port: The speed setting does not matter. These radios present a USB virtual serial port (CDC ACM) to the phone — data travels at USB speed regardless of the setting. Select any speed, such as 9600.
-
USB-to-serial adapter connected to a hardware TNC: Select the speed that matches the serial port speed configured in the TNC hardware. Common speeds are 9600 and 57600 bit/s. Check your TNC documentation.
Setting the Kenwood TH-D74 / TH-D75 to KISS mode
The same requirement applies as with Bluetooth: the radio must be in KISS 12 mode, not APRS 12 mode. In APRS 12 mode the radio handles APRS internally and does not forward packets to the phone.
In addition, the KISS TNC data port on the radio must be set to USB, not Bluetooth. If the data port is set to Bluetooth, the radio will send KISS data over Bluetooth SPP and nothing will come through the USB connection.
|
Caution
|
While the radio is in KISS mode, its built-in APRS functions — such as the station list, messages, and the built-in map — are suspended. Return to APRS 12 mode to re-enable the radio’s own APRS features. |
Using the Software DSP modem
The app contains a high-performance software modem which allows you to connect a transceiver directly to the headphone/microphone connector of your device. The DSP modem is available when an Extra Features subscription is active.
Hardware for attaching the device to a radio
In a pinch, placing the microphone next to the speaker of a receiver on the APRS frequency may also work for testing.
|
Caution
|
Remember to silence all alerts on your device when using VOX. Put it in the |
Receive audio level adjustment
Adjust the volume of your receiver so that the oscilloscope view shows a nice waveform which does not touch the red edges of the scope, when the squelch is open. The setting is not critical, as long as the level is not too high, causing distortion. Fairly low volumes work fine!
Transmit audio level adjustment
Adjust the transmit audio level using the normal volume controls of your device while the transceiver is connected. The device will remember a separate audio level setting for the headphone output.
Use a separate receiver to monitor the transmitted audio. Transmit audio should be a clean sine wave with no distortion. If the audio is distorted, reduce the transmit audio level until it is clean. For a rough adjustment compare the transmitted audio to other APRS stations on the air. If your audio sounds similar to other stations, it is likely OK. For best results use a service monitor or a spectrum analyzer to check the FM deviation.
When using a hardware VOX PTT cable, the transmit audio level should be set so that the radio transmits. A fairly high volume setting may be required to drive the PTT circuit, but the cable may also have a built-in audio level attenuator to prevent overdriving the radio.
PTT control and VOX
The app uses VOX (Voice Operated Transmit) to control the transmitter, as standard Android does not provide access to a PTT line. This means that the radio will start transmitting when it detects audio coming from the app, and stop transmitting when the audio stops.
|
Note
|
VOX is not ideal for data. The VOX built in most radios will start transmitting slowly because VOX is designed to not transmit from short noise bursts picked up by the microphone. It requires using a long TXDELAY setting in the TNC, so that the transmitter keys before actual packet data is transmitted. It will also key the transmitter for a long time after the audio stops, keeping the channel busy. During this time a quiet carrier will be transmitted, which may interfere with other stations trying to use the channel. Other stations may use DCD (Data Carrier Detect) to detect a carrier, which may not detect the quiet carrier. They may transmit on top of your tail, causing interference. A hardware VOX PTT cable has no such delay issues. |
Configuration tips for VOX operation:
-
TX delay (aprs.fi Settings): A time delay introduced before transmitting packet data, during which special flag bytes are transmitted. It allows the transmitter to key and stabilize, and the receivers to open squelch and synchronise to the incoming data stream.
When using VOX of a radio, set it to a long value, such as 50 (500 ms). Then lower it gradually in steps of 10 (100 ms) while checking that other stations can still decode your packets reliably.
When using a hardware VOX PTT cable, the TX delay can be set to a shorter value, such as 20 (200 ms), as the transmitter will key up quickly.
-
VOX delay: Shortest available setting
-
VOX gain / sensitivity / level: Set so that the radio only starts transmitting when the app plays back audio.
-
Squelch: On many radios, squelch needs to be enabled for VOX to work, because received noise coming from the speaker would otherwise trigger the VOX. If the radio supports VOX while the squelch is open, it is recommended to leave squelch open for better receive performance. This may reduce battery life on handheld radios.
-
Power saving features will keep the receiver powered off for most of the time, and only enable it periodically to check for an incoming transmission. Enabling it will conserve battery power, but will cause packets to be missed, as the beginning of the short data burst will be cut off.
Oscilloscope and Waterfall views
The new GPU hardware accelerated oscilloscope and waterfall views show the audio signal in real time. The oscilloscope view shows the current audio waveform, while the waterfall view shows the audio spectrum over time.
-
Press the OSC / WF button to switch between the two views. The button may be disabled for some older devices which do not support the GPU accelerated waterfall.
-
Press the T button repeatedly to adjust the refresh time.
-
In the Oscilloscope view, press the D button repeatedly to adjust line decay time.
|
Note
|
While the DSP modem is running, the app will continuously record and play back audio. This is a valid background execution mode, so the app will continue to receive and transmit APRS packets in the background. |
Using a TNC via TCP/IP
The aprs.fi app can connect to KISS TNCs and software modems with a TCP KISS port over the network. If a TNC on the local Wi-Fi network supports mDNS service discovery (Bonjour), it will be automatically discovered and listed in the Select a TNC view. If not, you can add a TNC manually by entering its DNS hostname or IP address, and the TCP port. Using the manual method you can also connect to a remote TNC through a VPN connection.
A popular option is to install the Dire Wolf software DSP modem on a Raspberry Pi, or on a PC running Linux, Windows or macOS. The software can be configured to listen for TCP KISS connections on a specific port (8001 by default), and it will work with the aprs.fi app. Dire Wolf supports mDNS service discovery on Linux and macOS.
The WX3in1 device also has KISS over TCP, but it only supports receiving packets, and does not have mDNS.
|
Caution
|
The TCP KISS connection method does not support authentication. Do not make a TCP KISS TNC available to the Internet with port forwarding, as anyone on the Internet could connect to it and transmit packets. Always use a VPN to connect to a remote TNC. |
TNC and Beacon status on the map
When a TNC connection is active (connected, or trying to connect) or beaconing is enabled, a status overlay appears at the top of the map, continuing down from the status bar. It shows one line for the TNC and one for beaconing.
The TNC line shows:
-
A TNC badge coloured by the connection state: green when connected, orange while connecting or reconnecting, and grey when idle. While the TNC is not connected, the badge text is crossed out with a diagonal line.
-
Two small RX and TX indicators. RX lights up green while a signal is being received and TX lights up red while transmitting; both labels are dimmed while the TNC is not connected. With the software DSP modem the indicators follow the real receive (DCD) and transmit (PTT) state of the modem. With an external KISS TNC, which does not report this, each indicator instead blinks briefly whenever a packet is received or transmitted.
-
The most recently received or transmitted raw packet, truncated to fit. When the packet was sent by your own station (its source callsign matches the selected beacon profile), it is shown in bold.
The Beacon line shows a green Beacon badge, which briefly flashes brighter each time a beacon is transmitted, and the digipeaters that have repeated your beacons.
When beaconing via a TNC, a REP badge next to the Beacon badge shows at a glance whether your beacons are getting out. It is bright green when your most recent transmission has been repeated by a digipeater, plain green when one of your last three transmissions has been repeated, and grey otherwise.
The digipeaters which repeated any of your last 5 transmitted packets are listed, and the ones that repeated your most recent transmission are shown in bold, so you can quickly see which stations heard you last. When you are not beaconing via a TNC, your selected callsign is shown as well; while beaconing via TNC the callsign is omitted to leave more room for the list of digipeaters.
There’s More
Settings
Application settings can be accessed from the More tab → Settings. Settings are divided the following sections:
-
Privacy – device privacy settings for the app
-
Map view:
-
Default time range settings
-
Disable display sleep: Off / In map view / When plugged in / Always
-
Show road traffic
-
And more…
-
-
Units and time: Measurement units and UTC time zone selection
-
Messages:
-
Receive messages with all SSIDs: If enabled, the app will receive messages sent to all SSIDs of your currently-selected callsign.
-
-
aprs.fi Software Modem:
-
KISS TNC parameters of the 1200 bit/s AFSK DSP modem
-
-
Send usage statistics: Enable or disable sending metrics to the aprs.fi service. This is optional, but helps to improve the app and the service.
iGate
A basic receive-only iGate is available in the app. It will receive packets from a TNC, and upload them to the APRS-IS via the aprs.fi backend. The iGate currently does not transmit any packets, and it does not support digipeating.
The iGate is enabled from the More tab → iGate. The iGate will use the callsign-SSID selected in the Beacon tab.
A table of recently heard stations can be accessed from the iGate tab. It shows the callsign, symbol, distance, and the time of the last heard packet for each station. When packets from a station are received via different paths, all the paths are displayed. The table is also maintained when the iGate is disabled.
Map Overlays
Custom map overlays can be loaded on top of the APRS map from the More tab → Map Overlays. Each overlay is a named GeoJSON or KML file loaded from a URL or imported from a local file. KMZ files (zipped KML) are also supported. The maximum overlay file size is 50 MB.
A file can be transferred to aprs.fi directly from another app on the device — use the share function in any app (such as Files or Dropbox) and select aprs.fi as the destination.
Supported feature types:
-
GeoJSON: Point, LineString, MultiLineString, Polygon, MultiPolygon, and GeometryCollection features. The feature
nameproperty is used as the label. -
KML: Placemarks containing Point, LineString, and Polygon geometries. The placemark
<name>element is used as the label.
Overlays are rendered on the map in blue. Tapping a line, polygon, or point placemark opens a callout showing the feature name.
Multiple overlays can be configured and individually enabled or disabled.
My account
This is where you can log in to your aprs.fi user account, or create a new one. Logging in is necessary for messaging, beaconing your position, and sychronizing your favourites and settings with the aprs.fi service.
You may also change the main callsign attached to the account here, using the Change button.
If you have multiple callsigns, you can set up multiple station profiles in the Beacon tab, each with a different callsign, SSID and settings. The callsign-SSID selected in the Beacon tab is used for beaconing and messaging. The callsign-SSID of each profile can be changed with the Rename button in the Beacon tab.
If you wish to change the email address of your aprs.fi account, or add a backup email address, please do it on the Account page of the aprs.fi web site:
-
Add a new email address
-
Confirm it by clicking the link in the confirmation email
-
Set the new email address as the primary address: Click Change and make primary.
-
(Optional) Remove the old email address
Subscription
A subscription is required to use the Extra Features of the app. The subscription can be purchased from the Subscription tab in the More tab. The subscription model is used to ensure funding for the continued development and maintenance of the app and the aprs.fi service.
The subscription is available as a monthly or yearly plan. The yearly plan is cheaper than the monthly plan, and it is recommended for long-term users.
Subscriptions are managed by Google Play, and can be cancelled at any time. If you cancel your subscription, you will still have access to the Extra Features until the end of the current billing period.
Subscription sharing between Android and iOS, within the same aprs.fi user account, will be implemented in the near future.
Refunds
If you have purchased the app or subscription accidentally, or you are not satisfied with it, you can request a refund.
If the purchase was made within the last 48 hours, please request a refund directly from Google.
Otherwise, please contact the developer via the Feedback view, and the developer can issue the refund. Please provide the following details from your receipt email:
-
Order number
-
Order date
-
Your account (Google account email)
Please note that once a purchase is refunded, the corresponding product will stop working.
Feedback and support
If you have any questions, feedback, or issues with the app, please contact the developer via More tab → Feedback → Send feedback over email. The application is developed by a single developer, myself, and I will do my best to answer your questions, but sometimes it may take some time to respond. Please be patient!
You can also send a message to the aprs.fi discussion group where many users and APRS developers are active.
The group is a good place to ask questions and report issues, but please note that it is specific to the aprs.fi web site and app, and not a general APRS group. Messages about other APRS applications or services may be rejected. Messages from new users are moderated, so they will not appear immediately.
Footnote
Thank you for reading all the way to the end, and for using the aprs.fi Android app! I hope you find it useful and enjoyable to use.